Code
GNUVario-E source codes
Compiling with VSCode - PlatformIO
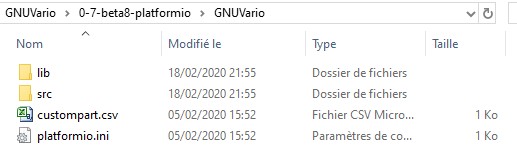
Beforehand, you must download the sources locally from the GIT repository. The local directory must contain at least:
- the src / folder, which contains the Gnuvario-E.cpp file
- the lib / folder, which contains the necessary libraries
- the platformio.ini and custompart.csv files
In VSCode, click on the ‘PlatformIO: Home’ icon in the horizontal bar at the bottom. The PlatformIO Home page will appear in the IDE.
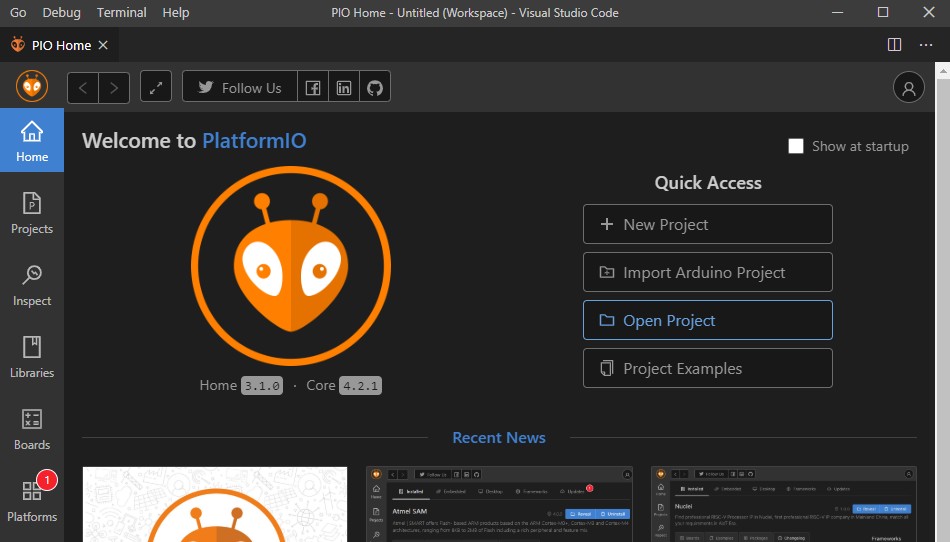
Click on ‘Import Arduino Project’.
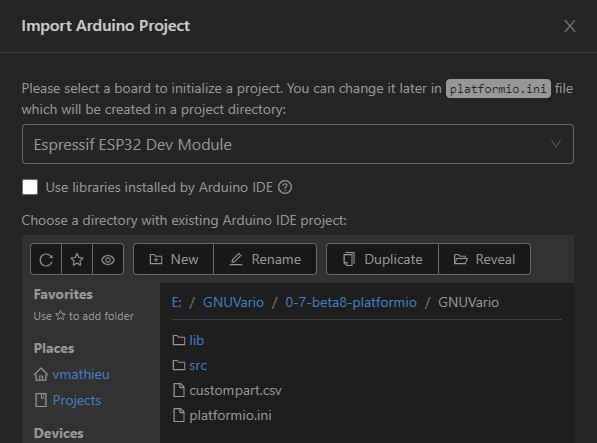
- select the ‘board’. To speed up the selection, enter esp32, then choose ‘Expressive ESP32 Dev Module’
- do not click ‘Use libraries installed by Arduino IDE’
- select the folder that contains the code retrieved from the git repository
- click on the ‘Import’ button
The project appears in the left column (EXPLORER) of the IDE; it is possible to explore the different files of it.
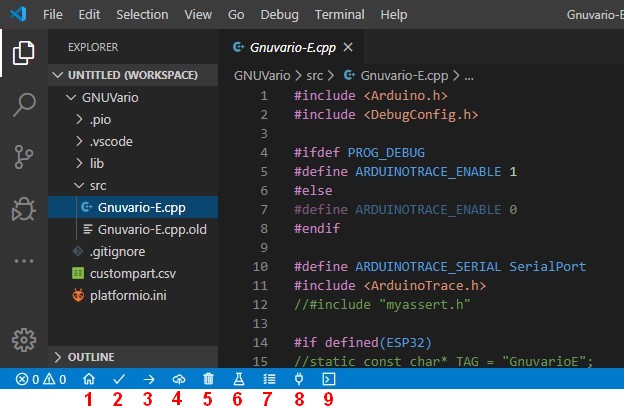
In the bottom horizontal bar, several icons linked to PlatformIO and the current project appear. The most interesting icons are:
- (1). PlatformIO: Home: open the PlatformIO Home window
- (2). PlatformIO: Build: compile the code
- (3). PlatformIO: Upload: compile code, and load it into vario
- (8). Platformio: Serial Monitor: opening of a basic serial terminal
You must now choose the screen/PCB combination that you have. To do this go to the src folder, HardwareConfig.h file
The choice of the combination is made by uncommenting the line corresponding to your combination. Here version 293.
//VERSION
//#define VARIOVERSION 154     //PCB Version 1 avec ecran 1.54 / PCB version 1 with 1.54" screen
//#define VARIOVERSION 254     //PCB Version 2 avec ecran 1.54 / PCB Version 2 with 1.54" screen
//#define VARIOVERSION 290     //PCB Version 2 avec ecran 2.9" paysage / PCB version 2 with 2.9" screen landscape (TTGO-T5-V2.4 before 12/2020)
//#define VARIOVERSION 291     //PCB Version 2 avec ecran 2.9" portrait / PCB version 2 with 2.9" screen portrait (TTGO-T5-V2.4 before 12/2020)
//#define VARIOVERSION 292     //PCB Version 2 avec ecran 2.9" paysage /PCB version 2 with 2.9" screen landscape  (Ecran/Screen Good Display GDEW029M06)
#define VARIOVERSION 293     //PCB Version 2 avec ecran 2.9" portrait / PCB version 2 with 2.9" screen portrait (Ecran/Screen Good Display GDEW029M06)
//#define VARIOVERSION 294     //PCB Version 2 avec ecran 2.9" portrait / PCB version 2 with 2.9" screen portrait (TTGO-T5-V2.4 after 12/2020 Screen number DKEG0290BNS800F6 /QYEG0290BNS800F6C02 ) For test purpose only
//#define VARIOVERSION 354     //PCB Version 3.1 avec ecran 1.54 / PCB Version 3.1 with 1.54" screen
//#define VARIOVERSION 390     //PCB Version 3.1 avec ecran 2.9" paysage / PCB version 3.1 with 2.9" screen landscape (TTGO-T5-V2.4 before 12/2021)
//#define VARIOVERSION 391     //PCB Version 3.1 avec ecran 2.9" portrait / PCB version 3.1 with 2.9" screen portrait (TTGO-T5-V2.4 before 12/2021)
//#define VARIOVERSION 392     //PCB Version 3.1 avec ecran 2.9" Good Display GDEW029M06 paysage / PCB version 3.1 with 2.9" screen landscape  (Ecran/Screen Good Display GDEW029M06)
//#define VARIOVERSION 393	   //PCB Version 3.1 avec ecran 2.9" Good Display GDEW029M06 portrait / PCB version 3.1 with 2.9" screen portrait (Ecran/Screen Good Display GDEW029M06)
//#define VARIOVERSION 395     //PCB Version 3.5 avec ecran 2.9" paysage (futur BNO085/86)
//#define VARIOVERSION 396     //PCB Version 3.5 avec ecran 2.9" portrait (futurBNO085/86)
To compil the code and upload it, you have to:
- start vario
- connect the vario to the PC via micro USB
- click on the PlatformIO: Upload icon
The compilation will be done. if no error, the compiled code will be loaded into the vario, and it will restart.